Dumplings

Here in New England, the air is crisp, the smell of wood smoke is in the air and the trees are dressed in fall colors of burnished gold, bright orange and blazing red. When I think of cooking, I think of comfort foods – warm familiar flavors from childhood. (Mac and cheese is one of my favorite comfort foods and is served locally with lobster added to it.)  My mother made another favorite – chicken and dumplings with chunks of chicken breast, carrots, celery and onions topped with fluffy dumplings that simmered in the broth. The dumplings were like matzo balls but were made with Bisquick and dropped on top of the soup. (Matzo balls are also a dumpling, but instead of a biscuit type of dough, they are made with matzo meal, a traditional unleavened ingredient, and are dropped into simmering liquid.)

Did you know that nearly every culture has some sort of dumpling? Asian cuisine includes gyoza and shumai. Italians make gnocchi and ravioli. Germans cut pieces of dough into boiling water to make spaetzles which expand in the water and then are sauteed in butter. Recently I made pierogis with a friend who was of Polish heritage.  We formed circles of dough and filled them with different combinations of mashed potatoes, sauerkraut, chopped spinach, onions and cheese. Then we folded them over and sealed the half circles with our fingers before boiling them and sautéing them in butter.  They were delicious!

Today, I want to share two recipes that you can prepare to fill your tummy and warm you up after spending the day outside hiking in the woods, picking apples or raking leaves. Enjoy!

One day when I did my culinary arts internship in Amalfi, Italy I was assigned to make the gnocchi for the restaurant. We served it with a simple tomato sauce, but it is also good sauteed in butter with sage. 

Gnocchi

Ingredients

1 pound potatoes

¾ c. flour

1 egg

1 egg yolk

¼ cup grated parmigiano

2 cups Tomato sauce

Basil

Directions

Cook the potatoes with their skins on by placing them in a pot of water and bringing them to a boil. Remove from pot when they are soft, but not overcooked or the amount of flour required to make the gnocchi will need to be greater and will result in heavier gnocchi.  Transfer to a bowl and use a potato masher. Cool to room temperature. Add egg, egg yolk and then flour, blending the ingredients with your hands.  Work carefully and quickly as the more you handle the dough, the tougher it will be.  You should now have a soft dough that holds together, doesn’t feel sticky and can be easily shaped.  Divide dough into sections and roll each one out like a snake. Cut into i-inch pieces and roll on “gnocchi” board or against a fork to imprint design.

Cook in boiling salted water until they float. Remove with slotted spoon. To serve, add to heated tomato sauce to which Parmigiano has been added. Garnish with basil. As an alternative you can sauté gnocchi in butter with sage leaves. Garnish with Parmigiano.
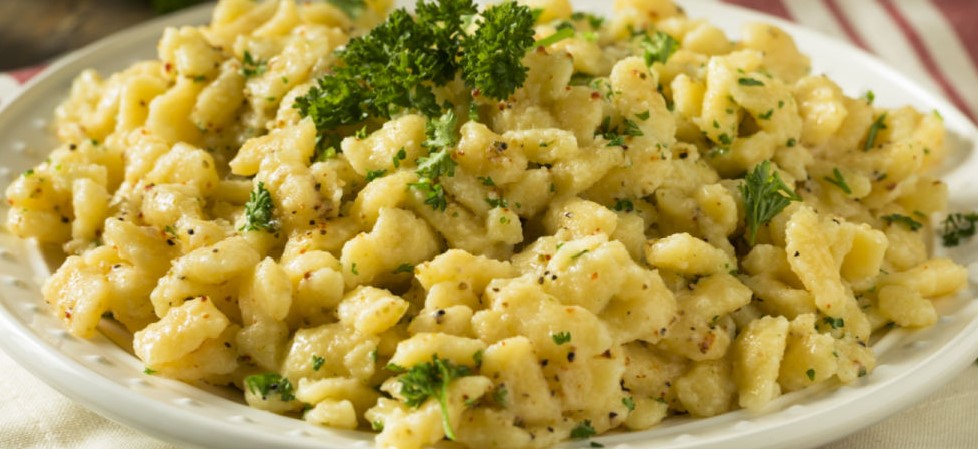
German Spaetzles

Ingredients

2 cups of sifted flour

3 eggs

2 egg yolks

2/3 cup milk

1 ½ teaspoon salt

¼ teaspoon pepper

¼ teaspoon nutmeg

1 tablespoon fresh parsley, minced

¼ cup butter

Additional 2 tablespoons parsley

Directions

In a large mixing bowl, combine all ingredients except butter and mix until blended. Ake a large spoonful of the batter, and using another spoon, portion off small segments of the dough into a large pot of boiling, salted water.  Simmer for about 5 minutes until they float to the top of the water. In a large skillet over medium low heat, melt butter and additional 2 tablespoons of parsley.  Using a slotted spoon, remove the dumplings from the boiling water and transfer them to a skillet. Fry until golden brown. Serves 4.

NOTE:  These can be combined with fresh, steamed green beans as a side dish or can be served alone or with gravy from Sauerbraten or roast beef.

Green Beans, Mozzarella & Grape Tomatoes

Ingredients:

1 lb. green beans

2 c. small fresh mozzarella balls

1 lb. grape tomatoes

2 T. extra virgin olive oil

2 T. fresh basil leaves, sliced

Salt and pepper to taste

Directions:

Steam green beans until tender.  Remove from heat and plunge into an ice water bath to stop cooking and retain bright green color.  Cut into 2-inch lengths. Combine in a large bowl with mozzarella, and tomatoes.  Add basil and dress with extra virgin olive oil.  Chill until ready to serve.

Broccoli Salad

Ingredients

2 heads of broccoli, broken into small florets

1-2 cups cheddar cheese, medium grated

1 cup dried cranberries

½ lb. bacon, cooked & crumbled

½ cup salted pumpkin seeds or pepitas

½ cup diced red onion

1 red bell pepper, diced

Dressing

½ cup mayo

½ cup sour cream

2-3 Tablespoons milk Combine all salad ingredients in a large bowl.  In a small bowl or glass measuring cup, combine ingredients for dressing. Whisk until smooth. Pour over salad & toss to combine. Refrigerate until ready to se

A Summer Barbecue

The weather in New England has been especially hot lately and the last thing I want to do is cook inside on the stove. So, let’s fire up the grill and invite friends over for a summer barbecue!  Here is a menu that will please everyone:

Grilled marinated Flank Steak

Salmon filets

Wild Rice Salad

Broccoli Salad

Green Beans with Mozzarella and Grape Tomatoes

Sour Cream Cheesecake with fresh Blueberries

Flank steak:  I like to use McCormick’s Grill Mates Monterey Steak marinade which only takes 15-20 minutes to tenderize the meat. Cook over a hot grill until medium rare (130o to 140o) & slice thinly diagonally. I like to serve steak with a Horseradish Sauce made by adding prepared horseradish to sour cream.  This sauce is also excellent with salmon.

Salmon filets: Place each salmon filet individually in a square of heavy-duty aluminum foil.  Before you close the “pouch,” put a pat of butter on top of each filet, place a slice on lemon on top of the butter, squeeze a little lemon juice on the salmon and sprinkle with fresh chopped dill. Then seal the package by folding the top seam first and then folding up the ends.  These little pouches can be placed on a hot grill for 15-20 minutes or they can be cooked in a 350o oven for the same amount of time. They will be so juicy and flavorful!

Salads: The salads remind me of a colorful summer flower garden! They are all vegetarian, and the wild rice one is vegan. Actually the broccoli salad recipe calls for bacon, but I like to use Fresh Gourmet’s Bacon-Less Bits which are plant-based and made from pinto beans. Bacon-lovers will not be able to tell the difference – they’re delicious!

The salads can all be made a day ahead of time and will keep for a day or two covered in the refrigerator. The green bean salad needs to be brought to room temperature before serving as the olive oil may have solidified in the refrigerator, but the other two salads can be served cold. (I first had the green bean salad on the Amalfi Coast in Italy with large, cooked shrimp added to it. What a delicious lunch that was! It would be an excellent way to use any leftovers.)

Dessert: The recipe for the Wild Rice Salad was posted on my blog in February and the Sour Cream Cheesecake recipe was posted on my blog in March 2022 (www.theadmiralschef.com) and is also featured in my cookbook “The Admiral’s Chef: Recipes from a Navy Wife’s World Travels” available from Amazon.

The Broccoli Salad and Green Bean, Mozzarella and Grape Tomato Salad recipes follow this post.

Bon Apetito!

Sour Cream Coffeecake

Ingredients:

1 c. brown sugar

1 egg

½ c. butter

1 t. baking soda

1 ½ c. flour

¼ t. salt

1 c. sour cream

Confectioner’s sugar

Directions:

Combine all ingredients and blend until smooth.  Pour into greased and floured Bundt pan and bake at 350oF for 40 minutes.  Dust with confectioner’s sugar when cool.

Asparagus. Red Bell Pepper and Mushroom Quiche


Ingredients:

Piecrust

1 ½ c. all purpose flour

½ c. shortening

7 Tablespoons ice water

Filling

4 eggs

1 c. heavy cream

4 c. grated cheese (Mexican blend)

2 c. diced vegetables (mushrooms, red bell peppers, and asparagus)

Paprika or cayenne

Directions:

Preheat oven to 350 degrees.


Piecrust

Grease a 10-inch pie plate with shortening.  Measure flour and shortening in a bowl and
use a pastry blender or two knives to cut the shortening into the flour until
it is all the size of little peas. Sprinkle the flour mixture with the ice
water and stir with a fork until it clings together and begins to form a ball of dough.  Dust the countertop with a little flour to keep the dough from sticking.

Remove dough from fowl and knead it just a little to make
the dough smooth.  Roll it out on the countertop until it is a circle about 2 inches larger that the pie plate.  Dust with flour and flip the dough over as needed to keep it from sticking to countertop. Fold the dough in half and then in half again to make a wedge and transfer it to the pie plate. Unfold the
dough and fit it evenly into the pie plate. Trim and tuck under the edges all
the way around and then flute the edges with your fingers. (Use the thumb &
forefinger of one hand and the index finger of the other hand to pinch it into
a ruffle)


Filling

Place eggs and cream into a bowl and beat with mixer or
whisk until fluffy.  Combine cheese with egg mixture and stir until well-blended. 
Set aside while you saute the vegetables.  It is very important to use just a little
butter to saute the vegetables.  If you use too much butter or if you use olive oil, it may make the filling too soupy and prevent it from firming up in the oven. Transfer the cooked vegetables/meat
to the egg mixture and blend.  Pour filling into the prepared crust and sprinkle with paprika or cayenne.  Place in preheated oven for 30-40 minutes or until center is firm when you jiggle it and the top is golden brown. A knife inserted in the center can also determine if it is solid inside.


A Mother’s Day Brunch

The ancient Greeks and Romans first celebrated mothers and motherhood in honor of the mother goddesses Rhea and Cybele.  There was also a tradition in Europe and the United Kingdom of “Mothering Sunday” which was a Christian festival on the fourth Sunday in lent where the faithful would return to their “mother” church.  Eventually, the celebration diverged from its religious roots, and became a day for children to give their moms flowers and gifts. In the United States, Anna Jarvis conceived of Mother’s Day as a way of honoring the sacrifices mothers made for their children after her own mother died in 1905. President Woodrow Wilson signed a measure in 1914 officially declaring the second Sunday in May as Mother’s Day.

How do you celebrate and pay tribute to your own mother? Flowers, cards, a phone call?  Did you know more telephone calls are made on Mother’s Day than on any other day of the year? But, if your mom lives close enough, you might want to consider fixing her brunch.  Here is a great menu for that special day:

Asparagus, Red Bell Pepper, and Mushroom quiche

Bacon/sausage

Oven-roasted Red Potatoes with Onions and Rosemary

Fruit salad with bananas, mandarin oranges, sliced strawberries, and kiwi

Sour Cream Coffee Cake

Start by sitting mom down with a Mimosa (orange juice and champagne) or a cup of coffee.  Hand her the newspaper, tie on an apron and let’s get cooking!

COFFEE CAKE: Actually, I recommend baking the Sour Cream Coffee Cake a day in advance (recipe follows) so you can save the oven for the Oven-Roasted Potatoes and the Quiche – which are both cooked at the same time and are best served warm right out of the oven.

POTATOES: To prep the potatoes, cut small red potatoes in half or quarter them to create bite-size pieces. Place in a casserole dish, add a drizzle of olive oil, a little thinly sliced onion, salt, pepper, a sprinkle of paprika and crushed rosemary. Stir to coat potatoes. Place in 350-degree oven the same time you put the quiche in the oven. The potatoes can be on an oven rack below the quiche. Stir again after 15 minutes to brown evenly and to prevent burning.

QUICHE:  I like to make my own pie crust and generally use a 10-inch glass pie plate. You are free to use a ready-made crust or ready-made pie crust dough.  But don’t forget to grease the pie plate with vegetable shortening! Making a quiche provides the opportunity to use leftover vegetables too.  I think of combinations of any three items like – spinach, mushrooms, scallions, broccoli, red onions, zucchini, yellow bell peppers, etc. But you can also repurpose left over meats like chicken, sausage, bacon, pepperoni, crabmeat, and salmon. The type of cheese you use can vary as well, although it’s best to use cheeses that melt easily like Swiss, provolone, gruyere, Monterey jack, Colby or mild cheddar. My recipe for quiche follows, but don’t be afraid to be creative!

FRUIT SALAD: Assemble the fruit salad while the quiche and potatoes are baking. I love to use a clear glass bowl for the fruit salad so you can see the colors of the fruit.  Slice strawberries, bananas, and peeled kiwis. Add fresh or canned mandarin orange slices.  You can also include chunks of fresh pineapple and blueberries, if you like, to create a rainbow of color. My favorite (optional) “dressing” for the salad is a couple of spoonsful of thawed frozen orange juice. Toss and place in refrigerator until ready to serve.

BACON & SAUSAGE: Bacon and sausage can also be cooked in a skillet on the stove over low heat while the quiche.

Buon apetito!

Spring Vegetables

Today is the third day of spring, although we’re having a late winter storm in New England and the ground is covered with a layer of snow. We are located in USDA Plant Hardiness Zone 6A and usually don’t plant our vegetable gardens or annuals until Memorial Day weekend to insure they survive. (The USDA Plant Hardiness map is based on 30-year averages of the lowest annual winter temperatures at specific locations.) But now (well, when the snow melts) is the time to start thinking about adding nutrition to the soil in your raised garden beds. The easiest way to do this is to add a few inches of composted manure or rich topsoil to the garden beds and rake it in. Once your soil is ready, you can begin planting vegetables that relish cool weather like arugula, lettuce, broccoli, cauliflower, and peas. These vegetables can be sowed directly into the soil and should be watered daily until they sprout.  If you don’t water them daily, they can dry out and shrivel up. Once they have grown their secondary leaves, you can add organic fertilizer to the garden. If you add this too soon, it can burn those new, delicate leaves. Vegetables like tomatoes, bell peppers, zucchini, eggplant, green beans, and beets can be started indoors or you can purchase starter plants from your local nursery. These vegetables can be transferred to the garden when all danger of frost has passed.  

The Food Pantry in the town where I live has a community garden that grows fresh produce for our shoppers. Occasionally some of the shoppers ask me how to prepare a certain vegetable or what dish they can make with the vegetables.

One of my favorite recipes for early spring vegetables is Pasta Primavera (“primavera” means spring in Italian). This may sound like an Italian dish, but it was actually created by New York restauranteur Sirio Maccioni’s restaurant Le Cirque. It was made famous in an article written for the New York Times by Craig Claiborne and Pierre Franey in 1977 which included a recipe for the dish.

I like to use a variety of tender spring vegetables with lots of different colors: peas, asparagus, broccoli, carrots, red and yellow bell peppers, zucchini and scallions. And although you could add them to your choice of pasta and dress with olive oil, I like a light cream sauce that clings to the pasta.

Pasta Primavera

Ingredients:

16 oz penne pasta (or shape of your choice)

Instructions:

1 teaspoon salt

1 tablespoon olive oil

8 oz asparagus, cut into I ½ inch pieces

1/2 yellow bell pepper, diced

1/2 red bell pepper, diced

2 cups small broccoli florets

1 small zucchini, sliced

8 cherry tomatoes, halved

2 scallions, sliced at a diagonal

1/2 teaspoon garlic salt

1 cup frozen peas

2 tablespoons butter

1 cup heavy cream

½ cup grated parmesan cheese

2 tablespoons lemon juice 

Salt and pepper to taste

Chopped fresh basil

Crushed red pepper flakes, optional

Instructions:

  1. Bring a large pot of water to a boil. Add 1 teaspoon salt and pasta to boiling water. Cook for 8-10 minutes or until tender, stirring occasionally. Drain well, reserving ½ cup of pasta water. Pour the pasta back into the pot and cover to keep warm.
  2. Meanwhile, in a large skillet, heat the olive oil over medium heat. Add the asparagus, peppers, zucchini and broccoli. Sprinkle vegetables with garlic salt and sauté for 2 to 3 minutes, stirring occasionally. Add the cherry tomatoes and scallions and cook for 1 to 2 minutes or until vegetables are tender, but still crisp. Transfer the vegetables to a large plate or bowl.
  3. Make the cream sauce. Place the skillet back on the stove. Melt the butter over medium heat. Stir in the heavy cream and ½ cup of Parmesan. Add 2 tablespoons of lemon juice. Cook until smooth. Add reserved pasta water If needed to thin the sauce.
  4. Pour the lemon cream sauce over the pasta. Add sauteed vegetables and peas and gently stir until well combined. Season with salt and black pepper, to taste. 
  5. To serve, garnish with chopped basil, extra Parmesan cheese, and crushed red pepper flakes. Serve warm.

Wild Rice Salad

Ingredients:

1 c. wild rice

3 c. water

¼ c. sliced almonds

½ c. dried cranberries

½ c. shelled edamame

½ c. diced red bell peppers

¼ c. scallions, sliced

3 T. white balsamic vinegar

¼ c. extra virgin olive oil

2 T. honey

Directions:

In a sauce pan over medium heat, bring water to boil. Add the rice, cover, and reduce the heat to low. Gently simmer for 45 minutes, until the rice is tender and the water absorbed.  Let the rice sit, covered, for five minutes.  Transfer to a serving bowl and stir in the almonds, cranberries, edamame, red bell peppers and scallions. Add olive oil, balsamic vinegar and honey and stir to coat rice mixture.  Serve at room temperature.  Serves 6.

Have a Rice Day

There are over 40,000 varieties of rice cultivated throughout the world, most of which are eaten by humans. Over half the earth’s population relies completely on rice as its staple food with China, India, and Indonesia being the largest consumers.

Ancient rice cultivation is documented in many cultures. Asian rice (Oryza sativa) was domesticated in China some 13,500 to 8,200 years ago and African rice (Oryza glaberrima) was domesticated in Africa some 3,000 years ago.

Today more than 90 percent of the world’s rice is grown in Asia, principally in China, India, Indonesia,  Indonesia and  Bangladesh, with smaller amounts grown in Japan, Pakistan, , and various Southeast Asian nations. Rice is also cultivated in parts of Europe, in North and South America, and in Australia.

It is boiled, ground into flour, made into breakfast cereals, snack cakes, noodles, and used for alcoholic beverages like Japanese sake.

Varieties

Varieties differ greatly in grain length, color, thickness, stickiness, aroma, growing method, and other characteristics. There are six varieties of rice that are consumed most in the United States. Let’s talk about them:

Brown Rice – Rice that is hulled or processed to remove only the husks, called brown rice, contains a small amount of protein and fats, and is a source of thiamine, niacin, riboflavin, iron, and calcium.

Jasmine Rice – White rice is rice that has been “polished” to remove the bran and germ after the seed is hulled. Thai Jasmine rice is a long-grain white rice with a flowery aroma and soft texture.

Basmati Rice – South Asian basmati rice (primarily from India) is a long-grain white rice with a nutty flavor. Basmati contains all eight essential amino acids and folic acid. It is very low in sodium and cholesterol-free besides having a low glycemic index, meaning that energy is released at a slow, steady rate.

Arborio Rice – Arborio rice is a short to medium-grain white rice used for Italian risotto. It undergoes less milling than ordinary white rice and therefore has a higher starch content which makes it chewier. Arborio rice, unlike other types of rice, should not be rinsed before cooking.

Short-grain white rice – This rice is stickier, and is used for sweet dishes, like Thai Mango Sticky Rice, and for Japanese sushi as it keeps its shape when cooked. After cooking, sushi vinegar (sushizu) is added to this short-grain rice to season it when it is used for sushi.

Wild Rice – There are four species of wild rice (Oryza Zizania) which grow in shallow freshwater marshes and along shores and streams in North America.

There are also purple, black, and red variants of rice, which can be eaten whole grain or milled.

Although rice is a good source of protein and a staple food in many parts of the world, it is not a complete protein as it does not contain all of the essential amino acids for good health. When white rice makes up a major portion of the diet, there is a risk of beriberi, a disease resulting from a deficiency of thiamine and minerals. Rice contains no gluten, however, and can be eaten by those with celiac disease.

Cultivation

Rice is derived from an annual grass which grows to about 4 feet in height with hollow stems and long, flat leaves. The flower cluster or panicle is made up of a spikelet with flowers that produce the fruit, or grain. It is primarily grown on submerged land in the coastal plains, tidal deltas, and river basins of tropical, semitropical, and temperate regions. The seeds are sown in prepared beds, and when the seedlings are 25 to 50 days old, they are transplanted to a field, or paddy, that has been enclosed by levees and submerged under 2 to 4 inches of water, remaining submerged during the growing season. In hilly areas rice farms are commonly terraced to keep the paddies flooded at various elevations.

Successful rice production depends on adequate irrigation, including construction of dams and waterwheels, and on the quality of the soil. Long periods of sunshine are essential. Fields must be drained and dried before harvesting.

Harvesting

Dry rice grain is milled to remove the outer layers. Machines such as combine harvesters are used in commercial operations. The grain is ready to harvest when the moisture content is below 25 percent. Harvesting involves reaping, stacking the cut stalks, threshing to separate the grain, and cleaning by winnowing (air is blown through to remove the chaff) or screening. The rice grain is dried as soon as possible to bring the moisture content down to a level that is safe from mold. Smaller producers rely on drying in the heat of the sun, with the grain spread out on mats or on pavement. When we lived in the Philippines, we would pass rice drying on tarps spread out on the side of the road.

A substantial amount of the rice produced in developing nations is lost after harvest through factors such as poor transport and storage. Rice yields can be reduced by pests including insects, rodents, and birds, as well as by weeds, and by diseases. 

The by-products of milling rice, including bran and rice polish (finely powdered bran and starch resulting from polishing), are sometimes used as livestock feed. Oil is processed from the bran for both food and industrial uses. Broken rice is used in brewing, distilling, and in the manufacture of starch and rice flour. Hulls are used for fuel, packing material, industrial grinding, and fertilizer manufacture, The straw is used for feed, livestock bedding, roof thatching, mats, garments, packing material, and broom straw.

Basic Rice Cooking Method

No matter how you’ll be cooking your rice, always rinse it first. Doing so removes excess starch   which can result in gummy rice if it is not rinsed off.  The best way to do this is to place the rice in a mesh strainer and agitate it with your hands while running cool water over the grains.  When the water runs clear, you’re done rinsing!

This is the classic way to cook rice on the stove.

  1. Use the right ratio of water. Add 2 parts water and 1 part rice to a large pot.
  2. Bring the water to a boil. Once it’s boiling, add a big pinch of salt.
  3. Reduce heat to low, cover the pot with a tight-fitting lid, and maintain a gentle simmer.
  4. Cook without peeking or stirring. Cook until the water is absorbed, about 18 minutes, or for about 40-45 minutes for brown rice. Try not to peek until the end of the cooking time so the steam doesn’t escape. Whatever you do, don’t mix the rice while it’s cooking — this will lead to gummy rice.
  5. Let the rice rest covered. Turn off the heat and let the rice sit, covered, for 10 minutes. During this time, the rice will steam for extra fluffy results.

Or you can use a rice cooker, with equal parts water to rice. Just follow the instructions with the rice cooker.